
1998 Blazer LT Door Panel Repair

Thread Starter
|
New Member
Joined: Apr 2008
Posts: 8
From: Louisville, KY

Ok, as many of you are aware too often the door handle screw mounts break or they are broken when the door panel is removed without removing the two door handle screws. First suggestion - always remove the two door handle screws when removing the door panel.
That being said, I had not done that resulting in my Blazer having a door panel that flopped around. Also I couldn't pull the door closed because the door handle was not screwed to the door.
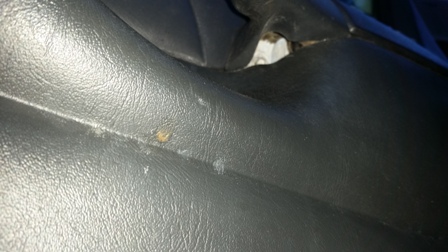
Replacement door panels are difficult to find and expensive. I finally located one that matched my grey, leather interior. From the pictures I was sent it looked in good condition.
The panel I received is in good condition however, the front door handle mount was broken out putting me almost into the same situation. As the rest of the panel was sound and good I decided to find a way to repair the mount. Following are pictures and explanations of my procedures.

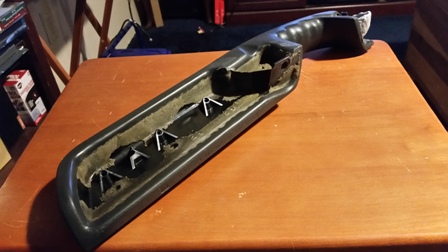
There are four screws that hold the handle to the door panel. I found a 9/32nds socket fit well. Here is the front of the door panel with the handle removed.

This is the inside of the door panel with the door handle removed.

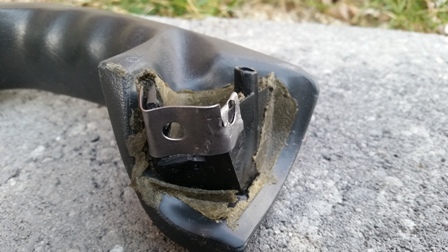
This is the front door handle mount before I started my repair. The plastic has broken out of the center which is where the mounting screw comes through.

I will be using an epoxy putty to repair the door handle. To help it grab hold I roughened up the plastic and drilled several small holes.
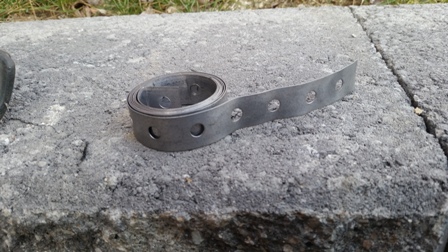
I wanted to try and increase the strength of the mount so I found this metal strip that I will use to make a mold. It is used as exhaust hanger and in car stereo installations. It is easy to cut with tin snips and easy to bend with your hands or pliers.
Here I have cut off a piece and molded it to the door handle. I made sure the hole of the metal was approximately where the screw mounting hole needs to be. If you look at the right side, due to how the handle is formed I was able to make a small cut in the metal so that I could bend a lip over the plastic further strengthening the application.
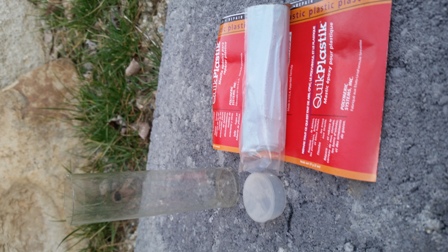
This is putty I had on hand. The brand doesn't matter. To use it cut off a section and then knead it with your fingers until it is mixed and only one color is seen. You have about 10 minutes to form it before it starts to harden. I left it overnight to let it harden as much as possible but this package says it will harden in 35-45 minutes.
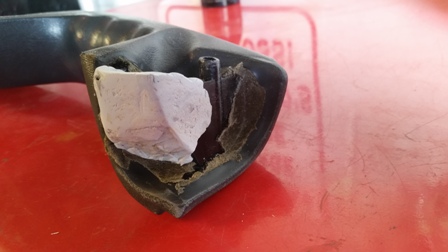
Here shows the putty applied to my form. I didn't worry too much about smoothing first because it will not be seen once installed and second because I intended to sand it and drill the mounting hole after it dried.

Here is looking inside the handle. Remember the mounting screw will be on the inside of the handle and in this shot will be pointing down through the mount so you want to make sure there is good material for the screw to press against.
Here is my handle that I left overnight to let the epoxy harden.
The next day I used my Dremel tool to sand and trim the epoxy.
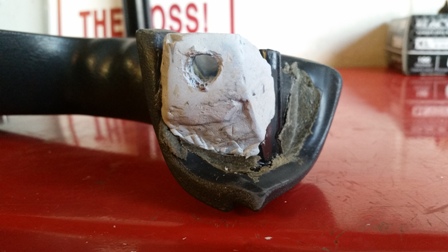
I then drilled a hole for the mounting screw. I later had to elongate the hole downward (in this view) to make the mounting screw speedinut accessible.

Here is a shot of the backside of the door panel showing the door handle installed by screwing the four screws back in that were removed earlier.
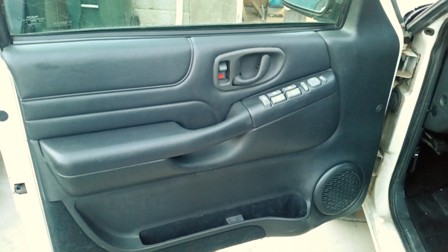
Here is my door panel installed and it looks almost as good as new. It does hold as good as new and feels very secure when closing the door with the door handle.
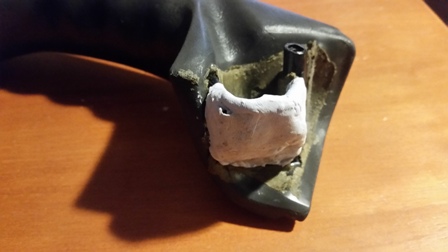
Finally a picture looking from under the handle up into the mount. The light grey material is the newly formed, metal reinforced, epoxy mount.
For added insurance I put a large washer under the mounting screw for the rear mounting location so as to spread the force out over a larger part of the mount.
All of my door clips had been damaged over the years I put up with my broken door panel. If you can wait order a kit on Ebay or elsewhere instead of going to your local autoparts store and paying $3 for a few plugs. I ordered a pack of 20 door clips for about $5.
That being said, I had not done that resulting in my Blazer having a door panel that flopped around. Also I couldn't pull the door closed because the door handle was not screwed to the door.
Replacement door panels are difficult to find and expensive. I finally located one that matched my grey, leather interior. From the pictures I was sent it looked in good condition.
The panel I received is in good condition however, the front door handle mount was broken out putting me almost into the same situation. As the rest of the panel was sound and good I decided to find a way to repair the mount. Following are pictures and explanations of my procedures.
There are four screws that hold the handle to the door panel. I found a 9/32nds socket fit well. Here is the front of the door panel with the handle removed.
This is the inside of the door panel with the door handle removed.
This is the front door handle mount before I started my repair. The plastic has broken out of the center which is where the mounting screw comes through.
I will be using an epoxy putty to repair the door handle. To help it grab hold I roughened up the plastic and drilled several small holes.
I wanted to try and increase the strength of the mount so I found this metal strip that I will use to make a mold. It is used as exhaust hanger and in car stereo installations. It is easy to cut with tin snips and easy to bend with your hands or pliers.
Here I have cut off a piece and molded it to the door handle. I made sure the hole of the metal was approximately where the screw mounting hole needs to be. If you look at the right side, due to how the handle is formed I was able to make a small cut in the metal so that I could bend a lip over the plastic further strengthening the application.
This is putty I had on hand. The brand doesn't matter. To use it cut off a section and then knead it with your fingers until it is mixed and only one color is seen. You have about 10 minutes to form it before it starts to harden. I left it overnight to let it harden as much as possible but this package says it will harden in 35-45 minutes.
Here shows the putty applied to my form. I didn't worry too much about smoothing first because it will not be seen once installed and second because I intended to sand it and drill the mounting hole after it dried.
Here is looking inside the handle. Remember the mounting screw will be on the inside of the handle and in this shot will be pointing down through the mount so you want to make sure there is good material for the screw to press against.
Here is my handle that I left overnight to let the epoxy harden.
The next day I used my Dremel tool to sand and trim the epoxy.
I then drilled a hole for the mounting screw. I later had to elongate the hole downward (in this view) to make the mounting screw speedinut accessible.
Here is a shot of the backside of the door panel showing the door handle installed by screwing the four screws back in that were removed earlier.
Here is my door panel installed and it looks almost as good as new. It does hold as good as new and feels very secure when closing the door with the door handle.
Finally a picture looking from under the handle up into the mount. The light grey material is the newly formed, metal reinforced, epoxy mount.
For added insurance I put a large washer under the mounting screw for the rear mounting location so as to spread the force out over a larger part of the mount.
All of my door clips had been damaged over the years I put up with my broken door panel. If you can wait order a kit on Ebay or elsewhere instead of going to your local autoparts store and paying $3 for a few plugs. I ordered a pack of 20 door clips for about $5.

New Member
Joined: Mar 2016
Posts: 85

Great job! I was looking for ideas to fix mine and the thing that's nice about epoxy is that you can drill and tap it once it cures. There's nothing more aggravating for me than driving down the road (and our S10/Blazers ride like buckboards) so every little crack seems to get amplified by the constant squeak of my plastic panels. I'm constantly getting on my wife and son to NOT slam the doors closed but it's already too late. Merry Christmas BTW!

Thread
Thread Starter
Forum
Replies
Last Post
lannon_j
2nd Generation S-series (1995-2005) Tech
2
Jul 14, 2012 09:38 PM