LOG IN
REGISTER
Forums
Announcements
Forum Notice
New Member Area
General
General Chat
The Lounge
Builds
Off Roading
Sights N Sounds
Street N Strip
The Chop Shop
Shows & Clubs
Mechanical & Maintenance
General Tech Help
Engine & Transmission
Lighting & Electrical
Steering, Suspension & Drivetrain
Modifications
Performance & Brainstorming
Tires and Wheels
Audio/Video Electronics
Paint, Body, & Interior
Suspension Tech
Detailing
Chevy Blazer Classifieds
Member Group And Special Buys
Absolutely Free!!!
PRIVATE For Sale / Trade Classifieds
Private 'Wanted' Classifieds
Online Auctions & Listings
The Site
Website Problems and Suggestions
Marketplace
Vendor Directory
Become a Vendor
New Posts
Tools
Car Payment Calculator
Tire Rim Calculator
Recalls
Technical Service Bulletins (TSBs)
Members List
Live Feed
Gallery
View Dark Mode
Please register or login to enable Dark Mode.
Log In
Register
Threads
Google
Threads
Posts
Advanced
Dark Mode
Please register or login to enable Dark Mode.
Log In
Forgot your Password?
By logging into your account, you agree to our
Terms of Use
and
Privacy Policy
, and to the use of cookies as described therein.
Recent
Commented
Albums
My Pictures
My Post Pictures
christine_208
October 15, 2017
759
3
Sort:
Default
Default
Most Recent
Top view of BRB with cap removed.
0
2021/08/01 12:15:09
christine_
The view of the BRB bracket from below as would be the actual view from your eyes. The parking brake cable is on the left of the picture.
0
2021/08/01 12:17:12
christine_
The upper attachment points are circled in red.
0
2021/08/01 12:23:18
christine_
Upper Radiator Hose
0
2021/08/16 15:06:03
christine_
Lower Radiator Hose
0
2021/08/16 15:06:04
christine_
Heater Hose 1
0
2021/08/16 15:06:28
christine_
Heater hose 2
0
2021/08/16 15:06:31
christine_
Bypass hose
0
2021/08/16 15:06:34
christine_
0
2021/09/15 11:59:02
christine_
0
2021/10/04 13:31:44
christine_
0
2021/10/04 13:33:00
christine_
0
2021/10/11 08:30:02
christine_
Blown old vacuum advance after trying to seal the old diaphragm with sealants.
0
2021/10/23 00:31:39
christine_
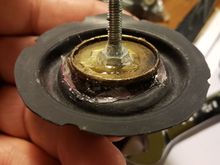
The disassembled vacuum advance (the top is not in the picture)
0
2021/10/23 00:32:06
christine_
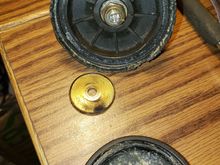
The repurposed diaphragm from an Autolite (Ford) 4100 carburetor. This is the vacuum secondary diaphragm.
0
2021/10/23 00:32:32
christine_
The new
0
2021/10/23 00:32:47
christine_
The replacement diaphragm.
0
2021/10/23 00:32:59
christine_
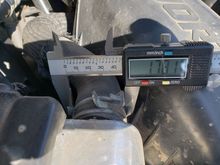
The vacuum advance uses a threaded rod as part of the mechanism to adjust the initial tension on the spring and the amount of advance/retard allowed. Used a bolt to replace this.
0
2021/10/23 00:33:10
christine_
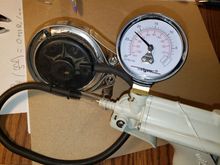
The initial test. I used a v-band clamp so that I can disassemble it.
0
2021/10/23 00:33:27
christine_
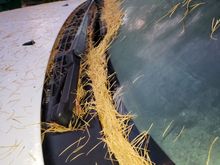
The needles starting to pile up on the windshield. The needles have only just begun to fall.
0
2021/10/30 01:06:10
christine_
These needles would normally have gone down under the grill and into the inlet for the HVAC. A few years ago I pulled out a good half-dozen big handfuls of these when I cleaned it all out.
0
2021/10/30 01:06:20
christine_
The offending trees. They are pretty but damn, they are a nuisance.
0
2021/10/30 01:06:38
christine_
0
2021/12/07 20:00:10
christine_
0
2021/12/07 20:01:49
christine_
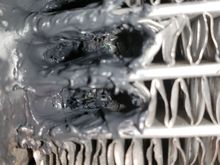
I did the repair woth the radiator in place. If I had had the time to do it properly, I would have removed it.
0
2021/12/15 12:39:11
christine_
0
2021/12/16 20:44:38
christine_
Uh oh! I'm on the wrong side of the gate!
0
2021/12/31 09:53:01
christine_
Now on the right side of the gate. Whew! BTW it was a steep drop-off on the left that is partly hidden by the tall grass.
0
2021/12/31 09:53:46
christine_
0
2022/01/16 18:45:32
christine_
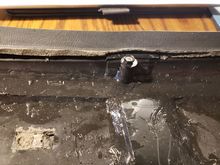
Picture showing the cracks. The bottom one has the cracks highlighted
0
2022/02/22 09:53:05
christine_
The final product. Before the application of the reinforcement pieces, I bent back the lid to slightly open up the cracks and applied acetone to help weld them closed. I used packing tape to pull the lid into shape to compress the cracks closed.
0
2022/02/22 09:53:34
christine_
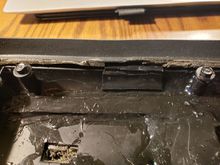
A reinforcement on the outer edge of the middle of the lid where one of the main cracks started. I put a small piece on the vertical and horizontal surfaces.
0
2022/02/22 09:54:04
christine_
The other side where there was a crack in the outer edge. These outer edge repairs were applied only with acetone which worked really well.
0
2022/02/22 09:54:30
christine_
Another view of the whole lid. In retrospect I used more of the slurry then needed. For this application the thicker parts took about 24 hours to cure.
0
2022/02/22 09:55:00
christine_
Lock mechanism removed from truck showing correct connections to it of some of the linkages.
0
2022/03/12 22:02:41
christine_
0
2022/03/13 16:26:01
christine_
0
2022/03/13 16:26:38
christine_
0
2022/04/02 14:53:36
christine_
0
2022/04/02 14:53:55
christine_
0
2022/04/02 14:54:15
christine_
First
Page
13 of 19
Last
Go To
Page
1
...
11
12
13
14
15
...
19
13 of 19
Go To
GO
Go to page
of 19
pages
1
...
11
12
13
14
15
...
19