Blazer Forum - Chevy Blazer Forums
  • LOG IN
  • REGISTER
  • Forums
    • Announcements
      • Forum Notice
      • New Member Area
    • General
      • General Chat
      • The Lounge
      • Builds
      • Off Roading
      • Sights N Sounds
      • Street N Strip
      • The Chop Shop
      • Shows & Clubs
    • Mechanical & Maintenance
      • General Tech Help
      • Engine & Transmission
      • Lighting & Electrical
      • Steering, Suspension & Drivetrain
    • Modifications
      • Performance & Brainstorming
      • Tires and Wheels
      • Audio/Video Electronics
      • Paint, Body, & Interior
      • Suspension Tech
      • Detailing
    • Chevy Blazer Classifieds
      • Member Group And Special Buys
      • Absolutely Free!!!
      • PRIVATE For Sale / Trade Classifieds
      • Private 'Wanted' Classifieds
      • Online Auctions & Listings
    • The Site
      • Website Problems and Suggestions
  • Marketplace
    • Vendor Directory
    • Become a Vendor
  • New Posts
  • Tools
    • Car Payment Calculator
    • Tire Rim Calculator
    • Recalls
    • Technical Service Bulletins (TSBs)
    • Members List
    • Live Feed
  • Gallery
  • View Dark Mode
    • Please register or login to enable Dark Mode.
  • Log In
  • Register
Blazer Forum - Chevy Blazer Forums
    • Threads
      • Advanced
Dark Mode

Please register or login to enable Dark Mode.

Log In

Forgot your Password?

By logging into your account, you agree to our Terms of Use and Privacy Policy, and to the use of cookies as described therein.
  • Recent
  • Commented
  • Albums
  • My Pictures

My Post Pictures

christine_208
October 15, 2017
 756
 3
Sort:
Most Recent
  • Default
  • Most Recent
Light blue: Overall length
Red: handle length
Pink: support width
Light Green: end piece width
Light blue: Overall length Red: handle length Pink: support width Light Green: end piece width
0 2024/12/17 16:43:57 christine_
New steering gear in place, but with the hoses not yet installed. I had trouble with one of them and worried I might cross thread it. I suspect there was excess paint on the threads. I should have test fit the hose fittings before I installed the gear.
0 2024/11/16 17:09:30 christine_
New steering gear installed. View from front, below radiator looking to back.
0 2024/11/16 17:08:47 christine_
Performing the vacuum air bleeding procedure on the power steering pump. You can see the bath tub stopper upside down on the filler to the pump.
0 2024/11/16 17:01:04 christine_
I had to use a drill to create a small divot in the flat spot of the input shaft to the steering gear for the Flaming River U-joint coupler. This would have been much easier before I installed the gear.
0 2024/11/16 17:00:41 christine_
The lip in the inside of the orange rubber cover on the lower intermediate shaft.
0 2024/11/16 17:00:16 christine_
Lower intermediate shaft disassembled.
0 2024/11/16 16:59:50 christine_
Using a crow-foot attachment on a 3/8" drive breaker bar to loosen the fitting on the back side of the power steering pump. (View is from below looking up and back.)
0 2024/11/16 16:59:08 christine_
Reaching in with the flare nut wrench to the back side of the power steering pump. A stubby version of this wrench could have been useful here. (View from above.)
0 2024/11/16 16:58:38 christine_
View after removing the original steering gear.
0 2024/11/16 16:58:09 christine_
The lower intermediate shaft. I had trouble reinstalling it because I was not able to contract it sufficiently until I realized the plastic liner was jammed.
0 2024/11/16 16:57:42 christine_
View of the backside of the power steering pump. There was a fitting that was hard to reach on the back side.
0 2024/11/16 16:57:07 christine_
view from above showing the old steering gear and the hose routing.
0 2024/11/16 16:56:28 christine_
The modified bath tub stopper. I installed the line to the Mity Vac to the black fitting.
0 2024/11/16 16:55:53 christine_
0 2024/11/16 15:19:37 christine_
0 2024/11/16 12:35:09 christine_
0 2024/11/16 12:34:10 christine_
The final product of the grinding away of the bracket for the idler arm pivot.
0 2024/11/16 12:16:33 christine_
I used masking tape and a red Sharpie to identify where the I needed to grind away parts of the bracket. I'd install the lower of the two mounting bolts and swing the pivot into place on the bracket to create these witness marks.
0 2024/11/16 12:15:30 christine_
Another view of the fan shroud, its cutout and the idler arm bracket.
0 2024/11/16 12:14:44 christine_
Looking up at the idler arm bracket and where I had to make a cut-out in the fan shroud for it.
0 2024/11/16 12:14:04 christine_
The idler arm bracket and upgraded idler arm parts installed. The pair of hoses on the upper left are the line to the extra transmission cooler.
0 2024/11/16 12:13:29 christine_
View from the wheel well towards the inside. The elevated brake line mounting at the top of the frame. (Green arrow)

The red arrow shows the top of the idler arm bracket.
View from the wheel well towards the inside. The elevated brake line mounting at the top of the frame. (Green arrow) The red arrow shows the top of the idler arm bracket.
0 2024/11/16 12:12:52 christine_
0 2024/11/16 12:01:42 christine_
0 2024/11/16 12:01:12 christine_
Test fitting the mounting bolt.
0 2024/11/16 11:59:12 christine_
Expanding the mounting hold for the mounting bolt that resides behind the pivot.
0 2024/11/16 11:58:50 christine_
Installing the bolt for the bracket that is behind the pivot using the 8mm Allen head socket.
0 2024/11/16 11:57:53 christine_
Proforged idler arm with nylok nut. I replaced this with a Moog version with castle nut that can be secured with a cotter pin
0 2024/11/16 11:57:13 christine_
0 2024/11/09 16:15:35 christine_
Same view from behind but zoomed in.
0 2024/10/13 15:46:21 christine_
Looking from the front to the back. The red arrow at about the 3-o'clock position shows where it looks like the pad has shifted. The second arrow at about the 6 o'clock position show where there as been some rubbing of one mount face against another.
0 2024/10/13 15:25:24 christine_
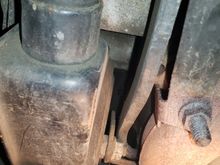
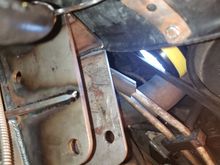
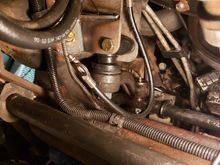
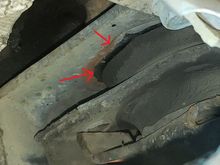
View looking forward from behind mount. The front of the starter is on the left, the exhaust manifold is at the top, and the frame rail is in the foreground. The red arrows show what looks to be where the upper pad has slipped, allowing the engine to move aft and down a bit.
0 2024/10/13 15:24:54 christine_
0 2024/07/21 10:16:08 christine_
0 2024/07/21 10:15:30 christine_
0 2024/05/21 22:26:03 christine_
0 2024/05/06 11:27:39 christine_
0 2024/05/06 11:24:25 christine_
0 2024/05/06 11:21:53 christine_
0 2024/03/08 15:30:40 christine_
First
Page
3 of 19
Last
Go To
Page
  • 1
  • 2
  • 3
  • 4
  • 5
  • 6
  • 7
  • ...
  • 19
3 of 19
Go To GO
Go to page of 19 pages
  • 1
  • 2
  • 3
  • 4
  • 5
  • 6
  • 7
  • ...
  • 19

Top
Blazer Forum - Chevy Blazer Forums
  • Contact Us
  • FAQ
  • Archive
  • Advertising
  • Cookie Policy
  • Privacy Statement
  • Terms of Service
  • Your Privacy Choices
  • Manage Preferences

© 2026 MH Sub I, LLC dba Internet Brands


When you click on links to various merchants on this site and make a purchase, this can result in this site earning a commission. Affiliate programs and affiliations include, but are not limited to, the eBay Partner Network.