
Replacing UCA on a 2002 RWD with pictures


Thread Starter
|
Senior Member
Joined: Jul 2015
Posts: 707
From: Houston

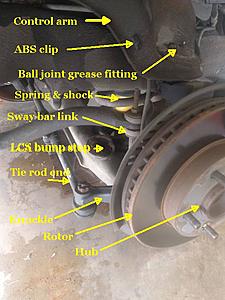
2002 Xtreme 2WD - Control arm bushings are shot, so at 11:30am I raised the truck onto a jack stand and removed the driver side wheel. First thing I notice is the LCA bump stop, all rotted out. Who knew?
Now, after my experience, the order I describe here is not the order I recommend. The big challenge in this job is removing the nuts behind the control arm, the ones that hold the arm to the frame - in particular on the driver's side, the rear nut. What you should do before you go any further is get under there and loosen that nut (see how below). If you can't, well, there is no point in pulling off the caliper and ball joint because you will just have to put it back together before you take it to the shop anyway.
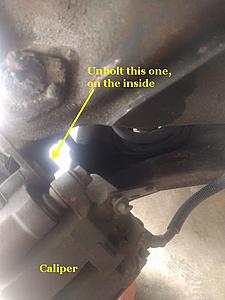
Next, I pulled off the caliper, the two bolts that hold it to the knuckle take a little PB Blaster and an 18mm, same as the two guide pin bolts (but don't remove those). Later, it seemed to me this was an unnecessary step, looks like you can leave the caliper on. If you do remove it, hang it out of the way with a piece of string through both bolt-holes so it will hang and the string will keep everything together better. When you go to reinstall it, put the C-clamp on the inner pad and tighten it so the pads have enough room to easily slide over the rotor.
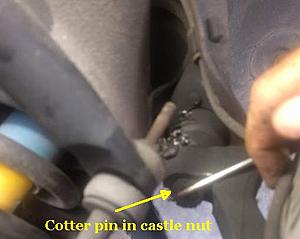
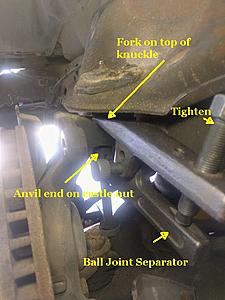
I used the jack to take some weight off the ball joint. In youtubes removing the cotter pin takes just 20 seconds, for me it took 20 minutes. The castle nut takes a 19mm (7/8").
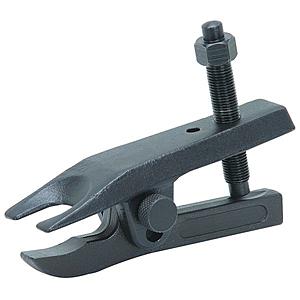
Time to pop the ball joint. I use a Harbor freight separator with the fork under the boot and the anvil end on the loosened castle nut. Then a 3/4" socket on cheater pipe on the ratchet so I'm not close when that thing pops. I hate that! At 60,000 miles of normal city driving the ball joints were in pretty good shape, actually, but I'm not reusing them.
I push out the rubber clip that holds the ABS cable, and wire it out of the way.
Since the bushings are shot, the control arm is easy to lift up and reveal the bolt heads that attach the CA to the frame. There I see the infamous lockers, which prevent the bolt from turning.
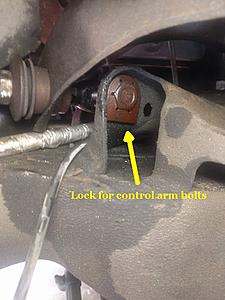
To me, it seems like a dremel saw could take those things out but actually that would make bolt removal worse. For now, let's go underneath and have a look at the nuts that holds them on..

The hard part on this job is getting those nuts off. I had prepped them earlier with PB Blaster but they were pretty clean anyways. They take an 18mm but for the rear one (driver side) I needed the deep socket because the threaded end stuck out too far for a regular. I went to AZ and picked up the socket, not realizing that is was a 1/2" drive. Luckily I had an 3/8 adapter so I could use my ratchet. The total length of the socket + adapter was 4" and after many, many contortionistic efforts to keep the socket on while pushing on the cheater pipe I was able to crank that nut off. I don't think 3.5" of length would work. Maybe 4.5" would be okay, maybe even longer, IDK. I can only say that it is doable with 4". Barely!
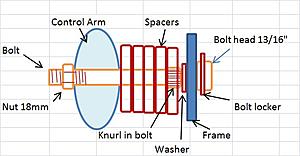
The forward nut was easier. It would take the short socket because it had more spacers. Notice though, that if the bolt locker wasn't on and preventing the bolt from turning, getting the nut off would be nearly impossible. With the nuts loose the CA can be pushed back and the spacers removed, make sure you get them all. I had 5 on the front and three on the back. As you can see in this layout, adding spacers pushes the control arm in, producing negative camber:
Now came challenge #2, pulling the bolts out. I did try pushing the CA to get the it off the bolts but there was not enough clearance. So, using a tip learned here (thank you!) I got out my C-clamp (5" opening) and a large socket, maybe 1-1/16 inch, and figured out a way to hold the socket on the locker with one hand, tighten the clamp with the second and reach in to keep the other end of clamp on the nut with my 3rd hand and voila, after some hard cranking the bolt head sprung free from the frame.
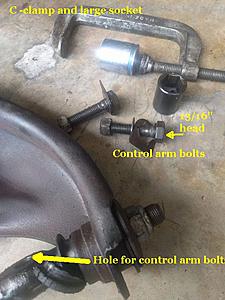
It turns out that the reason those bolts are in so tight is not the locker, actually. The bolt is knurled and there is a washer that sits between the knurl and the frame. To pull the bolt means pulling the knurl through the washer, which ain't easy. I think the knurl is a safety feature so that if you ever lost a nut of the spacers the bolts would stay in. When you go to put the bolts back in, make sure the washer is in the right place. Hmm. Now that I have explained it, I think I screwed up; I hammered the washer over the knurl and installed it that way, with the washer on the outside of the frame. Damn. Probably threw off the camber, too.
IDK how a person can reinstall the washer properly. Just put it on with the spacers and start cranking? Maybe instead of using one there you could go with a split lock washer under the nut.
Now it's 4 PM. Yes, a long time but in my defense I spent a lot of that time looking for tools. Take the time to buy a set of metric sockets 18,19, 20, 21mm (and maybe a 17 and 22, too) and a 18mm deep socket and open end wrench and a variety of extensions.
My new control arm + ball joint was a Moog, from Rockauto, its a perfect fit except the slot for the ABS wire clip was too big so I used a zip tie.
I PB Blastered the old bump stop, carefully extracted it and installed it in the new CA. Next I used a vice to loosen the CA bushing bolts maybe 1/4 turn so it would be easier to handle on the install. Set the arm in and then the bolts to hold it. You can reach in there and thread the nuts (which seem to be tapered-threaded so they get tighter the more you screw) and put the spacers back. To tighten I started by using sockets on the nuts but eventually switched to using a vise-grips to keep the nut from spinning and cranked the bolt down from the front. 65 ft lbs rear and 82 for the front one; For the bolthead, 13/16" IIRC, or maybe 20mm?
Next I set the lockers on the bolt heads and using a socket, hammered them on. Do it now, you won't get another chance after the ball joint is attached. Raised the jack under the control arm a little so the ball joint stud would fit into the knuckle with some hammer tapping. tighten castle nut 65 lbs, install cotter pin, clean the grease off the rotor, put the caliper back on, put the wheel on and lower truck . Now it is 7 pm and three beers later.
In the morning, recovered, I removed the wheel again and tightened the the bushing nuts that 1/4 turn, which I had forgotten to do.. A 15/16" wrench is what they take but failing that, a crescent wrench will work. I also got the grease gun and after figuring out how it works, filled the ball joint till I saw some grease leaking out.
Hope this works out for you folks fixin to replace a control arm. Good luck!
_______________________
On edit: I replaced the passenger side and will follow up with a short description of the differences.

Now, after my experience, the order I describe here is not the order I recommend. The big challenge in this job is removing the nuts behind the control arm, the ones that hold the arm to the frame - in particular on the driver's side, the rear nut. What you should do before you go any further is get under there and loosen that nut (see how below). If you can't, well, there is no point in pulling off the caliper and ball joint because you will just have to put it back together before you take it to the shop anyway.
Next, I pulled off the caliper, the two bolts that hold it to the knuckle take a little PB Blaster and an 18mm, same as the two guide pin bolts (but don't remove those). Later, it seemed to me this was an unnecessary step, looks like you can leave the caliper on. If you do remove it, hang it out of the way with a piece of string through both bolt-holes so it will hang and the string will keep everything together better. When you go to reinstall it, put the C-clamp on the inner pad and tighten it so the pads have enough room to easily slide over the rotor.

I used the jack to take some weight off the ball joint. In youtubes removing the cotter pin takes just 20 seconds, for me it took 20 minutes. The castle nut takes a 19mm (7/8").
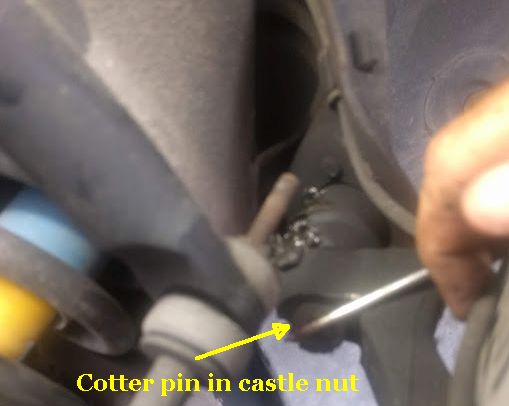
Time to pop the ball joint. I use a Harbor freight separator with the fork under the boot and the anvil end on the loosened castle nut. Then a 3/4" socket on cheater pipe on the ratchet so I'm not close when that thing pops. I hate that! At 60,000 miles of normal city driving the ball joints were in pretty good shape, actually, but I'm not reusing them.


I push out the rubber clip that holds the ABS cable, and wire it out of the way.
Since the bushings are shot, the control arm is easy to lift up and reveal the bolt heads that attach the CA to the frame. There I see the infamous lockers, which prevent the bolt from turning.

To me, it seems like a dremel saw could take those things out but actually that would make bolt removal worse. For now, let's go underneath and have a look at the nuts that holds them on..
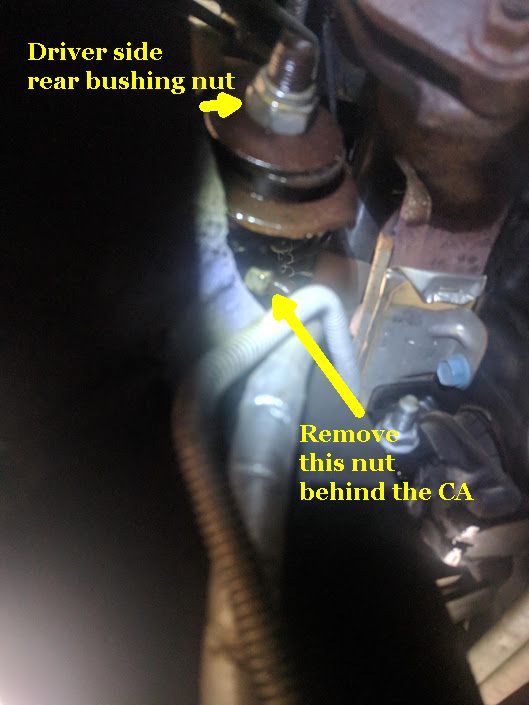
The hard part on this job is getting those nuts off. I had prepped them earlier with PB Blaster but they were pretty clean anyways. They take an 18mm but for the rear one (driver side) I needed the deep socket because the threaded end stuck out too far for a regular. I went to AZ and picked up the socket, not realizing that is was a 1/2" drive. Luckily I had an 3/8 adapter so I could use my ratchet. The total length of the socket + adapter was 4" and after many, many contortionistic efforts to keep the socket on while pushing on the cheater pipe I was able to crank that nut off. I don't think 3.5" of length would work. Maybe 4.5" would be okay, maybe even longer, IDK. I can only say that it is doable with 4". Barely!
The forward nut was easier. It would take the short socket because it had more spacers. Notice though, that if the bolt locker wasn't on and preventing the bolt from turning, getting the nut off would be nearly impossible. With the nuts loose the CA can be pushed back and the spacers removed, make sure you get them all. I had 5 on the front and three on the back. As you can see in this layout, adding spacers pushes the control arm in, producing negative camber:

Now came challenge #2, pulling the bolts out. I did try pushing the CA to get the it off the bolts but there was not enough clearance. So, using a tip learned here (thank you!) I got out my C-clamp (5" opening) and a large socket, maybe 1-1/16 inch, and figured out a way to hold the socket on the locker with one hand, tighten the clamp with the second and reach in to keep the other end of clamp on the nut with my 3rd hand and voila, after some hard cranking the bolt head sprung free from the frame.

It turns out that the reason those bolts are in so tight is not the locker, actually. The bolt is knurled and there is a washer that sits between the knurl and the frame. To pull the bolt means pulling the knurl through the washer, which ain't easy. I think the knurl is a safety feature so that if you ever lost a nut of the spacers the bolts would stay in. When you go to put the bolts back in, make sure the washer is in the right place. Hmm. Now that I have explained it, I think I screwed up; I hammered the washer over the knurl and installed it that way, with the washer on the outside of the frame. Damn. Probably threw off the camber, too.
IDK how a person can reinstall the washer properly. Just put it on with the spacers and start cranking? Maybe instead of using one there you could go with a split lock washer under the nut.
Now it's 4 PM. Yes, a long time but in my defense I spent a lot of that time looking for tools. Take the time to buy a set of metric sockets 18,19, 20, 21mm (and maybe a 17 and 22, too) and a 18mm deep socket and open end wrench and a variety of extensions.
My new control arm + ball joint was a Moog, from Rockauto, its a perfect fit except the slot for the ABS wire clip was too big so I used a zip tie.
I PB Blastered the old bump stop, carefully extracted it and installed it in the new CA. Next I used a vice to loosen the CA bushing bolts maybe 1/4 turn so it would be easier to handle on the install. Set the arm in and then the bolts to hold it. You can reach in there and thread the nuts (which seem to be tapered-threaded so they get tighter the more you screw) and put the spacers back. To tighten I started by using sockets on the nuts but eventually switched to using a vise-grips to keep the nut from spinning and cranked the bolt down from the front. 65 ft lbs rear and 82 for the front one; For the bolthead, 13/16" IIRC, or maybe 20mm?
Next I set the lockers on the bolt heads and using a socket, hammered them on. Do it now, you won't get another chance after the ball joint is attached. Raised the jack under the control arm a little so the ball joint stud would fit into the knuckle with some hammer tapping. tighten castle nut 65 lbs, install cotter pin, clean the grease off the rotor, put the caliper back on, put the wheel on and lower truck . Now it is 7 pm and three beers later.
In the morning, recovered, I removed the wheel again and tightened the the bushing nuts that 1/4 turn, which I had forgotten to do.. A 15/16" wrench is what they take but failing that, a crescent wrench will work. I also got the grease gun and after figuring out how it works, filled the ball joint till I saw some grease leaking out.
Hope this works out for you folks fixin to replace a control arm. Good luck!
_______________________
On edit: I replaced the passenger side and will follow up with a short description of the differences.
Last edited by puttster; Oct 8, 2018 at 09:38 AM.

Junior Member
Joined: Oct 2017
Posts: 288
From: Kansas City
"First thing I notice is the LCA bump stop, all rotted out. Who knew?"
I have two 2001 Blazers and had to replace them in both of them. Looks like a tough day but a productive one. Based on what I see I would replace them.
I have two 2001 Blazers and had to replace them in both of them. Looks like a tough day but a productive one. Based on what I see I would replace them.
Thread Starter
|
Senior Member
Joined: Jul 2015
Posts: 707
From: Houston
I got a set of them. Moogs for $4 each. They are a different shape but look like they will work. Oddly, it takes a 9/16" to remove the old ones and a 14mm deep socket to install the moogs. If you don't have one of those you can screw the nut on and cut off an inch of threads, then install.
Thread Starter
|
Senior Member
Joined: Jul 2015
Posts: 707
From: Houston
After describing my adventure replacing the UCA on the driver side I'll close the circle with some info about removing the one on the passenger side. If you decide to remove the caliper, the top bolt is a bear to get at, you will need your cheater bar too but I have heard of those boltheads breaking off, so... For the control arm nuts, I tried using the tools I used on the driver side but it was no go.
For the rear nut I came in from the top and used a 19mm open end wrench. I know it is a 18mm nut but I didn't have that in a wrench. By wrenching a a slight angle from perpendicular, and going in 45 degree increments at a time it will take a full 15-20 minutes. The front looks impossible. I was able to break it free but no mas. Then I went underneath with an electric wrench and a angle adapter (pic) and voila, gone in 5 seconds. I was lucky to have had the equipment.
Spacers were the same, 5 front and 3 back, must be factory standard. With the nuts off I could push the front of the CA off its bolt but used the C-clamp and 1 1/16" socket to pop the rear bolt out. To assemble I filed down the knurl on the bolt so the washer would slide on after the bolt was through the frame. (Probably a no-no, so I used a split lock washer under the nut to make up for it :-) Everything went fine (6+ hours) but after putting the caliper back on I saw that I'd left the bolt locker on the garage floor. grrrr. I'll save it to use if the nut ever needs to come off again, like for a camber adjustment, but will probably forget it and have to use a vice grips to hold the bolt :-{.
Anyway, that's my story. Good luck if you want to give this job a go.
Last edited by puttster; Oct 10, 2018 at 09:30 AM.

Thread
Thread Starter
Forum
Replies
Last Post
grayfort
Steering, Suspension & Drivetrain
4
Sep 16, 2013 03:38 PM
rodeofan5656
2nd Generation S-series (1995-2005) Tech
5
Aug 5, 2012 10:03 PM