When you click on links to various merchants on this site and make a purchase, this can result in this site earning a commission. Affiliate programs and affiliations include, but are not limited to, the eBay Partner Network.
The root cause of this problem is the hinge pins and pin bushings. The pins need be continuously lubed to prevent erosion of the pin/bushing contact area. Once erosion begins, it's just a matter om time before the door sags enough to misdirect the striker parts.
Any repair of the striker area must include the replacement of the hinge pins and bushings. The kits can be had at most auto parts stores for under $10 per hinge. GM dealers will charge 2 to 4 times for the same kit.
The hardest part of the hinge pin/bushing replacement is the R/R of the spring on the upper hinge.
When I repaired my striker, I found a plate about the same thickness as the original shims. I then drilled matching holes in the plate for the attachment bolts, attached the assy to the jamb, then tacked in place with a wirefeed welder. To be safe, remove the interior post panel and have someone with a spray bottle of water on the inside to make sure that no fires are started.
Ya i can tell the sag is the root of the problems, from them terrible designed hinges. then to top it off the catch the rips outa the pillar is in thin sheetmetal with too small of a foot that fatigues the area tell it cracks and rips. they should fire who ever designed this hinge catch design.
i have had plenty of old 70's 80's gm vehicles that still today worked great.
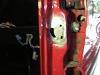
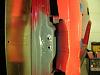
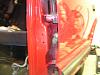
So the front door was rattling, took off the trim, seat belt, and striker.
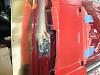
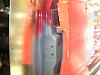
Cut some heavy gauge sheet metal and bent. Secured in place from behind with wood blocks locked in place with tapered shims. Welded in place, and put out burning shims. Removed blocking and welded all cracks, making sure I penetrated through to the patch. Grinded down excess weld. then grinded some more. Till it looked almost like original. Primed, filled imperfections with caulk, and painted. Pictures don't show it but I also cleaned up weld, primed and painted inside the pillar. Waiting for paint to dry to re-assemble.
Attached Thumbnails
So the front door was rattling, took off the trim, seat belt, and striker.
Cut some heavy gauge sheet metal and bent. Secured in place from behind with wood blocks locked in place with tapered shims. Welded in place, and put out burning shims. Removed blocking and welded all cracks, making sure I penetrated through to the patch. Grinded down excess weld. then grinded some more. Till it looked almost like original. Primed, filled imperfections with caulk, and painted. Pictures don't show it but I also cleaned up weld, primed and painted inside the pillar. Waiting for paint to dry to re-assemble.
Attached Thumbnails
excellent job! this is about how i plan to do mine. deffinatly want to add thicker metal i think. im thinking about just welding large fender washers in behind it.
So the front door was rattling, took off the trim, seat belt, and striker.
Cut some heavy gauge sheet metal and bent. Secured in place from behind with wood blocks locked in place with tapered shims. Welded in place, and put out burning shims. Removed blocking and welded all cracks, making sure I penetrated through to the patch. Grinded down excess weld. then grinded some more. Till it looked almost like original. Primed, filled imperfections with caulk, and painted. Pictures don't show it but I also cleaned up weld, primed and painted inside the pillar. Waiting for paint to dry to re-assemble.
Attached Thumbnails
Looks nice, but be sure to finish the job with new hinge pins and bushings.
16 gauge duct metal. Locked it in place with wood blocks and shims, made sure I got good penetration on the weld. Gray primer and Duplicolor spray paint. And yes, installed new pins and bushings.
Last edited by 10-78 edac; Jan 8, 2013 at 07:22 PM.
I came across another unit with this problem (other than my first experience) and simply cut one out of a salvage unit leaving as metal as possible,then tacked it in place and sealed with seam sealer,and had those hinges and pins replaced and the seams lined up as good as any GM vehicle! (bad) but it has worked for him for almost a year...now I need to do MY hinges...
yesterday I decided to finally attempt a repair on my 1999 blazer with this same issue, here are the before and after pics. I used 1/8" stainless steel I had on hand and this area is now far stronger than the original area ever was. Replaced hinge pins and bushings as well and my door now functions better than it ever has in the 7 years that I've owned the truck.