
2000 2 door blazer speaker replacement help

okay i made a thread which didn't really have a question so it was pointless...wanna replace the door speakers and the speakers in the back...im gonna cut out the door speaker grille...what do I have to do to install them that way?
im readin about drillin rivets out and cutting wires?? and I know how to remove the plastic over the back but whats the deal with those speakers...
between the spark plugs and now these speakers GM sure didnt wanna make it easy for their most popular SUV to be modded -____-
thanks
im readin about drillin rivets out and cutting wires?? and I know how to remove the plastic over the back but whats the deal with those speakers...
between the spark plugs and now these speakers GM sure didnt wanna make it easy for their most popular SUV to be modded -____-
thanks

Senior Member
Joined: Oct 2010
Posts: 931
From: Monroe City, IN

I've got all the information you want on doing that little project. Removing the factory grille is best done by grinding away the ring around the grille from the back side. That will get the factory grilles out without marring up the front side so everything looks good. There are four rivets that hold the crappy factory plastic baffle to the door. It's not at all difficult to drill those out and use either some #12 or #10 self tapping screws to hold the factory baffle back into place until you get the custom baffles built.
What I did was remove the factory baffle and trace the outside of it on some MDF to get the basic layout of the baffle. Then I cut some rings out to move the speaker out from the door. With the grilles removed I used two 3/4" MDF rings on top of the 3/4" MDF baffle plate and got the speakers to protrude just past the door panel. The entire custom baffle was glued, assembled then sealed with a weatherproofing clear coat and plasti-dip. It's been holding up well against the elements but some fiberglass resin and bed liner would be a better set of products to use.
Here's pictures of the processes to help give you a better idea of the steps.
Cutting out the factory grille. I used a 1/4" right angle die grinder to grind away the plastic ring around the grille.
Starting the process.

Getting some of the ring ground away.

Pretty well gone.

Voila, factory grille is gone and the front is left looking very clean.

Senior Member
Joined: Oct 2010
Posts: 931
From: Monroe City, IN
Now for the custom baffles. I started by tracing the outline of the factory baffles onto the MDF. I did this so that the custom baffle would be shaped right for all the right spots to mount it to the door. Even at 3/4" thick it clears the door panel all the way around and doesn't need shaved down or reshaped in order to be used, lucky us! I actually only traced one side, then after cutting out the first one I traced it out and cut out the second one. Being that they're flat it's not a big deal to "flip" the second one for the other side. Be sure to mark the locations for the mounting holes while the factory baffles are out.

I used a router with the Jasper Circle Jig attached to cut out the rings with precision. A jigsaw is usable with a steady hand but this sure makes it easy and the tool has uses all over the place for us car audio tinkerers. A router that the jig fits can be picked up for $100 at Lowes so anyone can pick this handy tool up for about $150 and save yourself hours of frustration trying to cut this kind of stuff out with a jigsaw.


Now I attached the rings to each other.
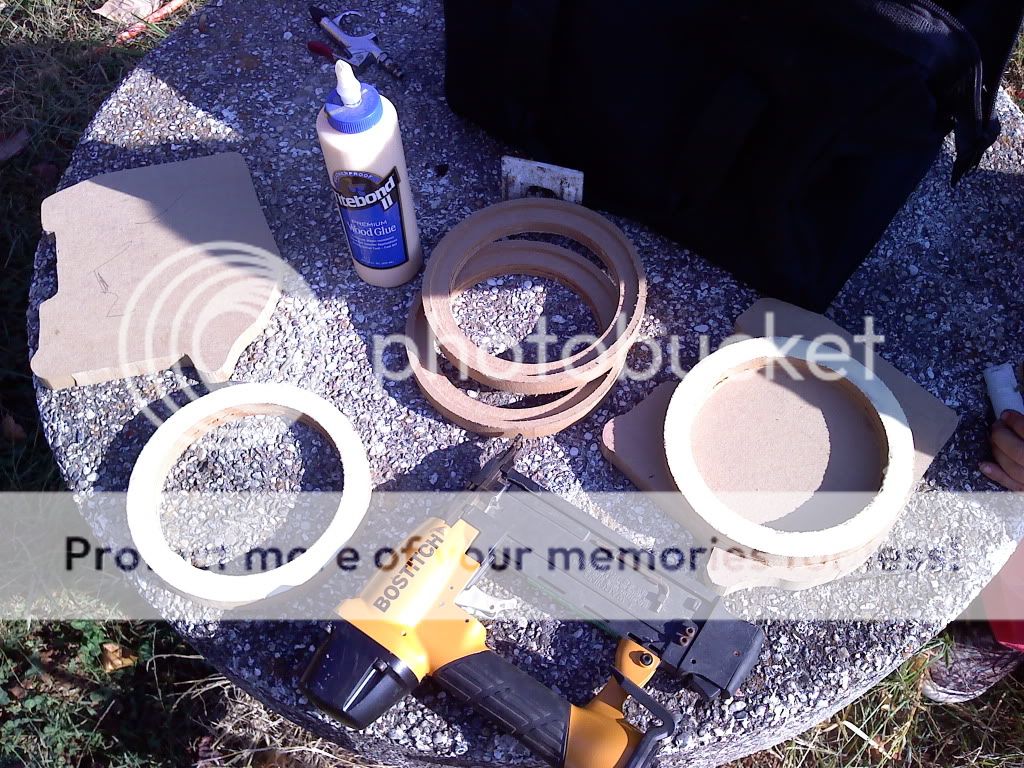

At this point I temporarily mounted the baffle plate to the doors then put the door panels back on. I slid the rings through the holes where the factory grilles were and used some thin cardboard from some boxes to center them in the opening. Then I traced the inside of the rings onto the baffle plates so I would know precisely where they needed to be attached. After I glued and attached them to the baffle plates I cut out the holes. I rough cut the holes with a jigsaw then used a flush trim bit in my router to make them perfect.


At this point I treated the MDF baffles to help with their weatherability then just mounted them up.


Out with the old.

In with the new. I used some weatherstripping tape to act as a gasket but to also allow the baffle a little leeway in mounting to keep the angle of the rings perfect through the opening in the door panel.


Voila, all done!


Thread
Thread Starter
Forum
Replies
Last Post
OhioLefty
Audio/Video Electronics
13
Dec 21, 2012 12:11 PM