
95Teal4X4's DD Build, Lots of Pics


Thread Starter
|
Starting Member
Joined: Jul 2016
Posts: 220
From: South New Jersey

Ok, so in addition to getting my Kicker speakers today(haven't installed them yet) i also got my order from rock auto. The Blazer has been squeaking all the time from the rear, when you get out of it it creaked real loud for about 3 seconds. i could hear it squeak while driving too. So i ordered 2 boxes of 4 of their leaf spring cushions on RockAuto. Each side has 3 cushions on it. I took it out for a drive tonight after installing them, (was only about 20 minutes total) and it is quiet and rides a little smoother in the rear. you will see why in the pics
Leafs before:


Yeh they were really shot, so out with them. Here is the box of the new ones:

After I installed them: yes, that second pic is upside down i don't know why, my leafs are sagging but not that bad lol.

Ok, so that was my project for today. Now i'm going to try to get in some more of the stuff i have already done. I put Kicker 6.5's in the front doors. There was a time where 3 of the 4 door speakers didn't work lol. My dad had an old oem speaker he bought from GM long time ago we installed a few months ago in the right door but currently the left rear door still does not work. So that will be happening in a few days.By the way highly recommend buying from Crutchfield, they ship fast and give you all the installation stuff you need. Here is my installation of the kickers in the front doors:
Old Speaker:

New Speakers:


I also painted my roof rack with the Rustoleum roll on truck bedliner. Yes i know it will probably fade since it is not Rhinoliner or something like that but i think it came out really good. Before the rack looked like any other rack you see so you don't need to see that.
After:


I refinished the stock trailer hitch that the blazer came with from the factory from the tow package a while back. We removed it to do a good job. We took off the back bumper to do it and were greeted by this:

I wanted it protected and looking pretty even if you never see it. Its one less spot i don't have to worry about rusting.
Prepped and painted:

WIth all the newspaper off, looks really good:

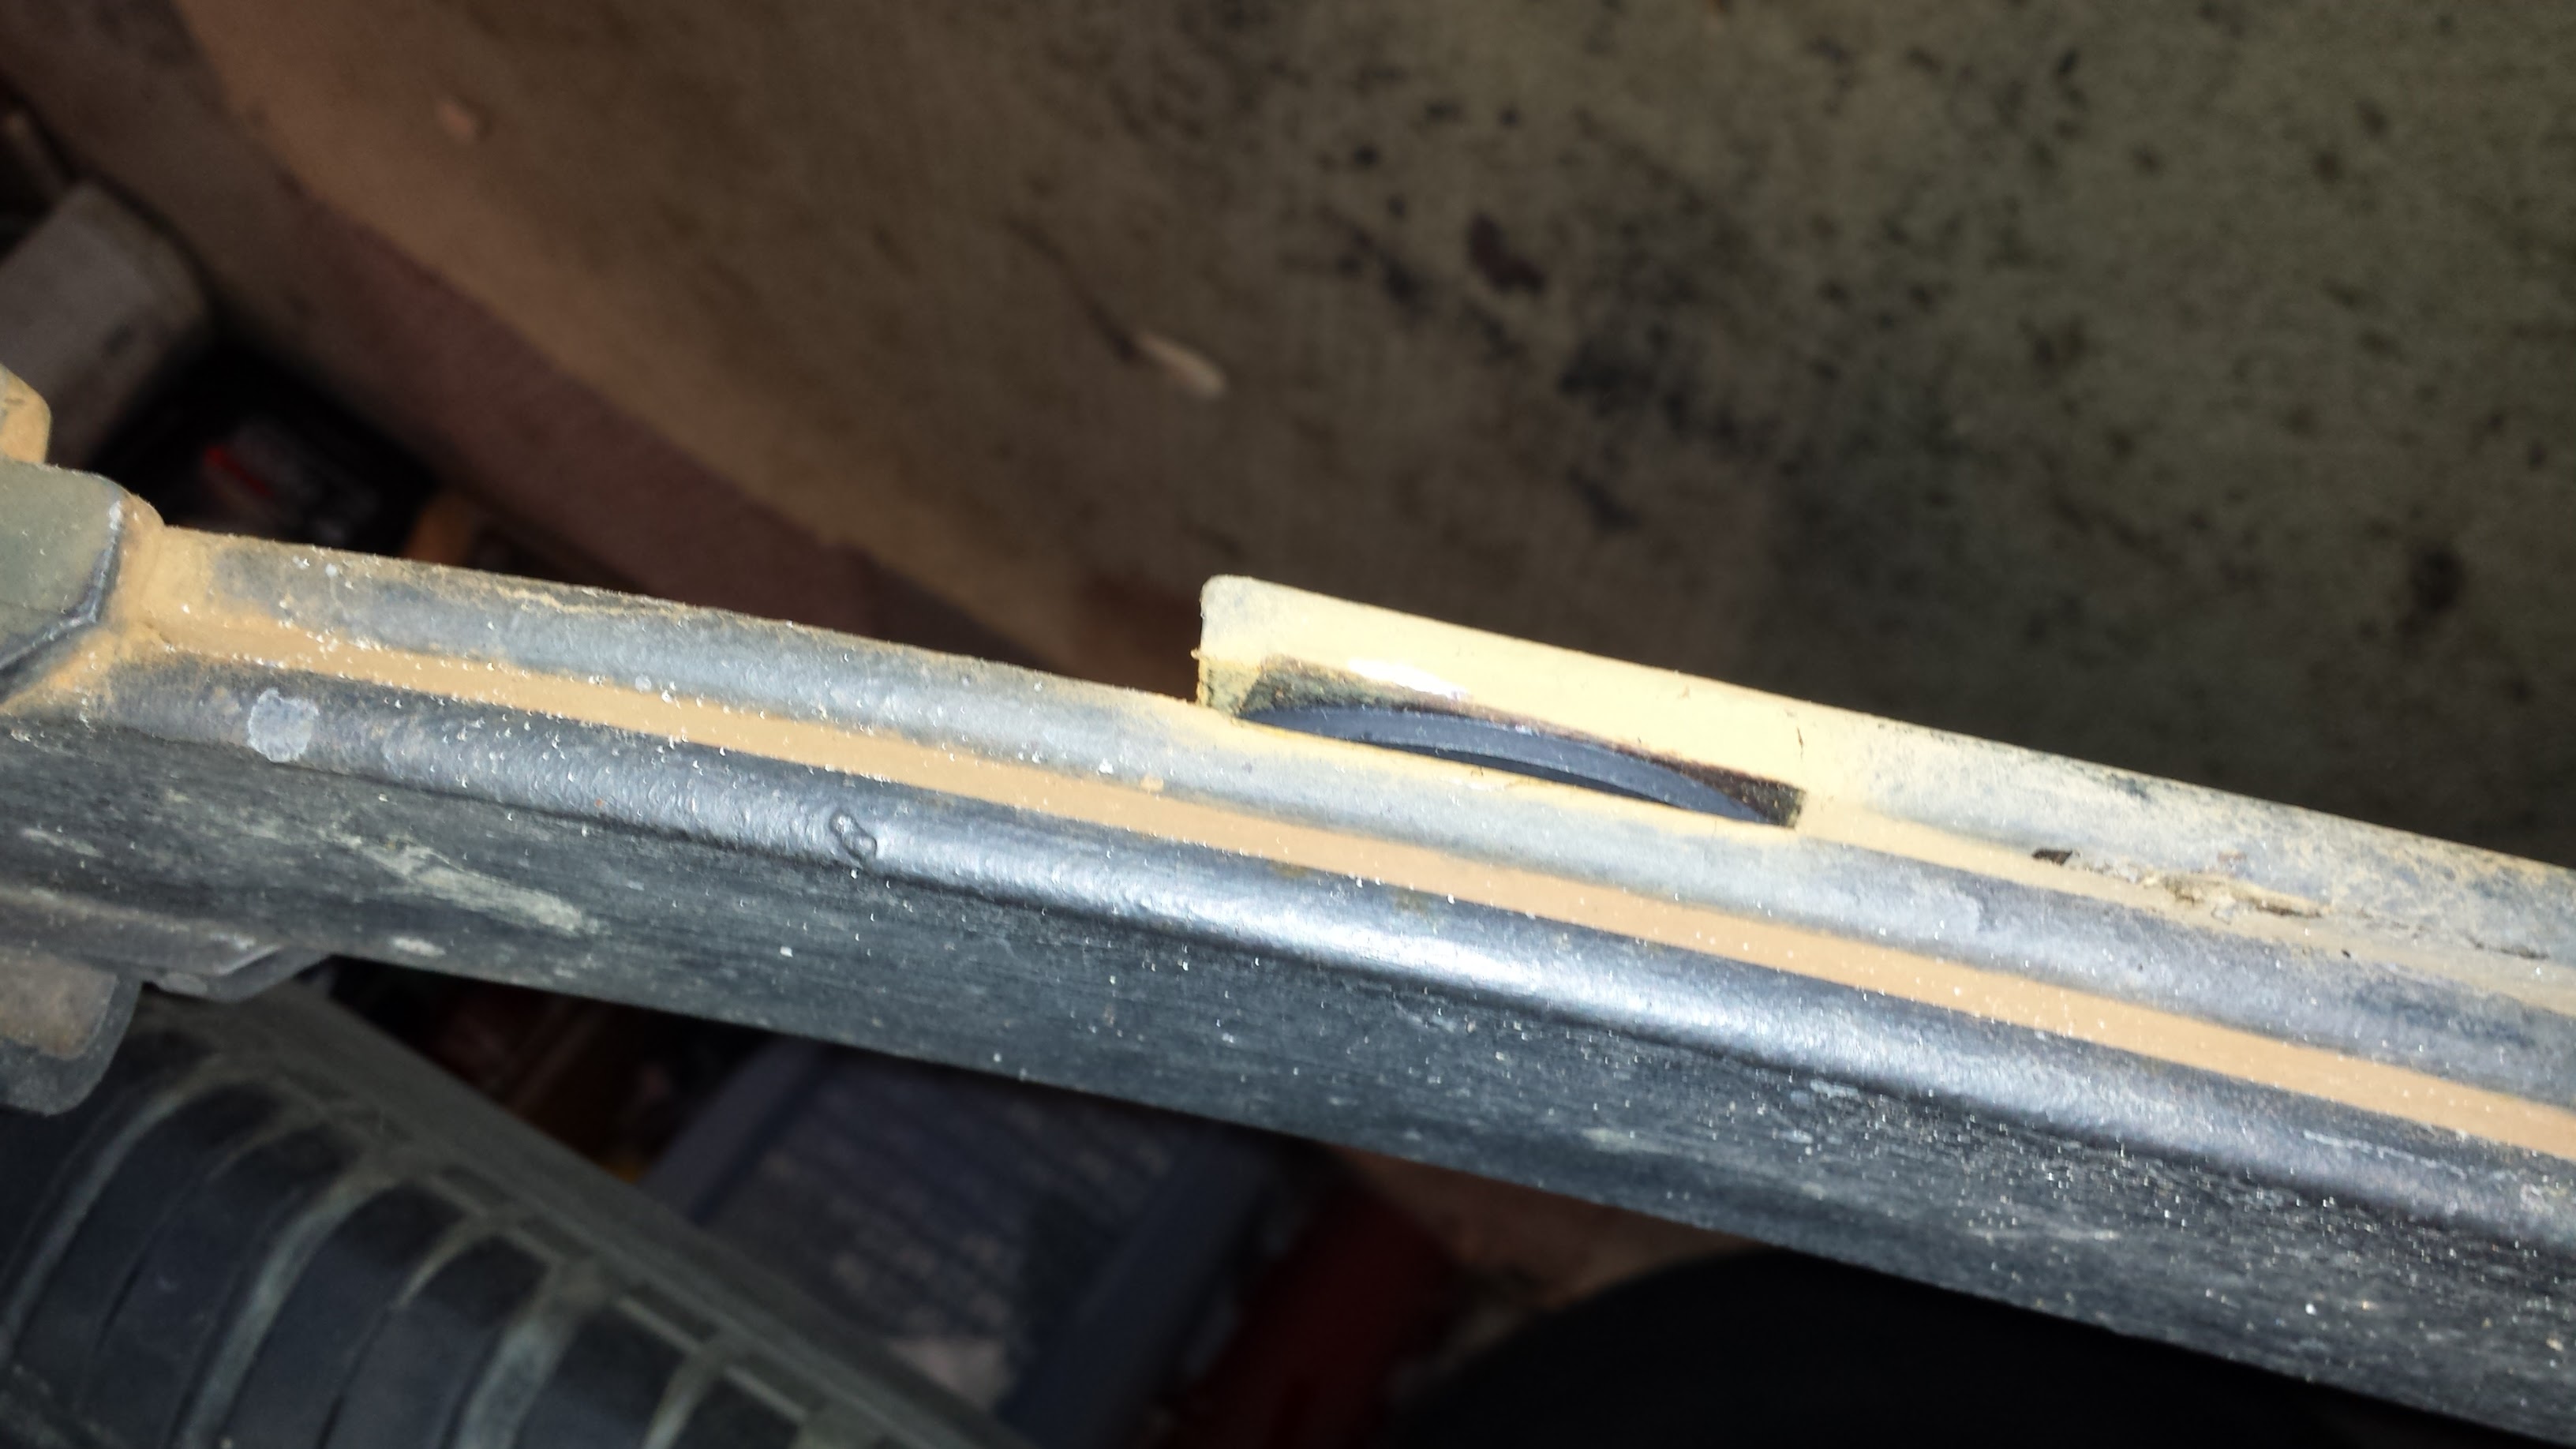
I did upper control arm bushings on the driver's side. The old ones were so shot, every time you came to a complete stop they would make a snapping noise. I don't have a lot of pictures from that. but i repainted the control arm with bedliner and also did all the spots of the frame that were rusty and didn't have any undercoating on them anymore.
I have done a few of the body mounts because they were starting to make knocking noises. I haven't done the tops on many of them. The ones at each corner of the frame were terrible. The washers on the bottom rusted off, so did the bottom bushing. so it was really ugly. So we did the first full one and it turns out the hole where the metal part of the bushing would fall in had rotted out around it.
As a result, it had a lot of extra room to move around inside of it. We had a piece of steel left over from a previous job so we cut out a piece of cardboard that would fit over the top of the mount. Drew the size hole from the bottom of the new bushing and cut it out with a torch. We cut the hole in the center with a torch too.
Here is the old front cab body mount bushings, yikes:


And then i got the front bolt out, wow. Wasn't so lucky with the back. Since it snapped, we just did it in full with top bushing and bottom bushing. that's where we made this bracket:

Here are the bolts, the thin one is the front....gasp:

A few weeks later i decided to do the passenger side front so i did the same full mount because it was practically sitting on the bushing cup and on bumps was metal on metal. i still had the piece of cardboard left from the first job so i cut another bracket out of the same piece of steel and painted it with bedliner. I also MIG welded the bracket and the part of the frame that holds the mount together. i have to get pics of this install. i will post some tomorrow. it looks great!
One last thing for today(more to come) i painted the rad support in the engine bay too, because it was looking really beat. i did take the intake out and also the top cover of the the fan so i could paint under it. Which reminds me, i need to paint the fan lol:

Leafs before:
Yeh they were really shot, so out with them. Here is the box of the new ones:
After I installed them: yes, that second pic is upside down i don't know why, my leafs are sagging but not that bad lol.
Ok, so that was my project for today. Now i'm going to try to get in some more of the stuff i have already done. I put Kicker 6.5's in the front doors. There was a time where 3 of the 4 door speakers didn't work lol. My dad had an old oem speaker he bought from GM long time ago we installed a few months ago in the right door but currently the left rear door still does not work. So that will be happening in a few days.By the way highly recommend buying from Crutchfield, they ship fast and give you all the installation stuff you need. Here is my installation of the kickers in the front doors:
Old Speaker:
New Speakers:
I also painted my roof rack with the Rustoleum roll on truck bedliner. Yes i know it will probably fade since it is not Rhinoliner or something like that but i think it came out really good. Before the rack looked like any other rack you see so you don't need to see that.
After:
I refinished the stock trailer hitch that the blazer came with from the factory from the tow package a while back. We removed it to do a good job. We took off the back bumper to do it and were greeted by this:
I wanted it protected and looking pretty even if you never see it. Its one less spot i don't have to worry about rusting.
Prepped and painted:
WIth all the newspaper off, looks really good:
I did upper control arm bushings on the driver's side. The old ones were so shot, every time you came to a complete stop they would make a snapping noise. I don't have a lot of pictures from that. but i repainted the control arm with bedliner and also did all the spots of the frame that were rusty and didn't have any undercoating on them anymore.
I have done a few of the body mounts because they were starting to make knocking noises. I haven't done the tops on many of them. The ones at each corner of the frame were terrible. The washers on the bottom rusted off, so did the bottom bushing. so it was really ugly. So we did the first full one and it turns out the hole where the metal part of the bushing would fall in had rotted out around it.
As a result, it had a lot of extra room to move around inside of it. We had a piece of steel left over from a previous job so we cut out a piece of cardboard that would fit over the top of the mount. Drew the size hole from the bottom of the new bushing and cut it out with a torch. We cut the hole in the center with a torch too.
Here is the old front cab body mount bushings, yikes:
And then i got the front bolt out, wow. Wasn't so lucky with the back. Since it snapped, we just did it in full with top bushing and bottom bushing. that's where we made this bracket:
Here are the bolts, the thin one is the front....gasp:
A few weeks later i decided to do the passenger side front so i did the same full mount because it was practically sitting on the bushing cup and on bumps was metal on metal. i still had the piece of cardboard left from the first job so i cut another bracket out of the same piece of steel and painted it with bedliner. I also MIG welded the bracket and the part of the frame that holds the mount together. i have to get pics of this install. i will post some tomorrow. it looks great!
One last thing for today(more to come) i painted the rad support in the engine bay too, because it was looking really beat. i did take the intake out and also the top cover of the the fan so i could paint under it. Which reminds me, i need to paint the fan lol:
Thread Starter
|
Starting Member
Joined: Jul 2016
Posts: 220
From: South New Jersey
In other news, I'm going to try to maybe install my kicker speakers thursday. Once I get home, I'll post a couple pics. I still have a lot of things I have done but not posted.
By the way do any of you guys have experience refinishing aluminum skid plates? I can live with how they are now but I think they could look way better.
Last edited by 95teal4x4; Dec 5, 2016 at 05:01 PM.
Thread Starter
|
Starting Member
Joined: Jul 2016
Posts: 220
From: South New Jersey
I went to the local pick and pull about a month and a half ago in search of the OnStar unit cover in a blazer equipped with it. Thanks to Tajohns for the inspiration The place i like and get my parts from has about 6 blazers in it. Out of the 6, 1 had it. So i went in with a few tools and removed it. I got it for 30 bucks. Eh, not a steal but not a ripoff either. It definitely needed a cleanup.

About a week and a half later, i went back to the yard and pulled the interior quarter panel to get measurements from it. My blazer's interior quarter panel looks really good and i didn't want to drill holes in it if i didn't have to. Thinking they were same i got my quarter off and went to put the new one on. its off a probably 2002 or 2003. Yeh they were incompatible and it sucks because they weren't too far off but i wanted it to look oem so i got the measurements off of it and drilled a few holes in my quarter and a notch in the front for the top piece. Snapped in a few plastic tree clips i bought and i was all set. Now i use it for tool storage. i have a little cheap emergency harbor freight 1/4" ratchet set back there, a few flares, a couple bungee chords stuff like that. But i may want to try to get an inverter back there. Perfect spot. If anyone sees this mod i did and likes it or has questions, feel free to PM me and ill be happy to answer them.
Before:

After:

The place i like and get my parts from has about 6 blazers in it. Out of the 6, 1 had it. So i went in with a few tools and removed it. I got it for 30 bucks. Eh, not a steal but not a ripoff either. It definitely needed a cleanup. About a week and a half later, i went back to the yard and pulled the interior quarter panel to get measurements from it. My blazer's interior quarter panel looks really good and i didn't want to drill holes in it if i didn't have to. Thinking they were same i got my quarter off and went to put the new one on. its off a probably 2002 or 2003. Yeh they were incompatible and it sucks because they weren't too far off but i wanted it to look oem so i got the measurements off of it and drilled a few holes in my quarter and a notch in the front for the top piece. Snapped in a few plastic tree clips i bought and i was all set. Now i use it for tool storage. i have a little cheap emergency harbor freight 1/4" ratchet set back there, a few flares, a couple bungee chords stuff like that. But i may want to try to get an inverter back there. Perfect spot. If anyone sees this mod i did and likes it or has questions, feel free to PM me and ill be happy to answer them.
Before:
After:
Super Member
Joined: Apr 2014
Posts: 1,968
From: Lake City, Florida
looking good!
I installed the same compartment in my 04 LS model and hid a small cheap 300watt amp in it for an 8" sub completely hidden, although any trip more than an hour it seems to heat up because of no ventilation and it'll shut itself off... pop the lid though and it'll jam for hours without issues lol
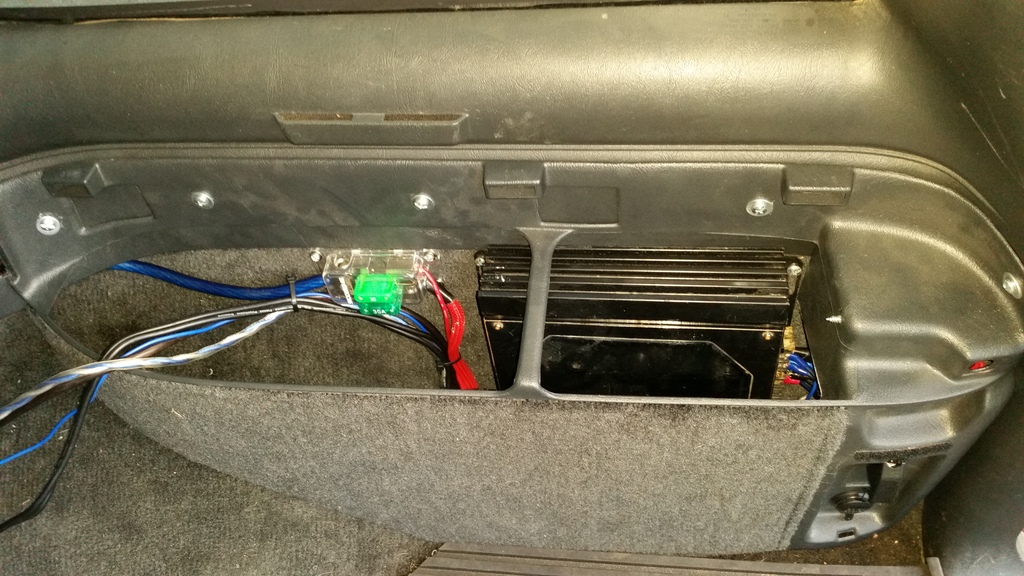

Also installed a 12v outlet with a switch for it, quick and easy spot to pull power for a tire pump or whatever else in the rear


Just for ideas
I installed the same compartment in my 04 LS model and hid a small cheap 300watt amp in it for an 8" sub
completely hidden, although any trip more than an hour it seems to heat up because of no ventilation and it'll shut itself off... pop the lid though and it'll jam for hours without issues lolAlso installed a 12v outlet with a switch for it, quick and easy spot to pull power for a tire pump or whatever else in the rear
Just for ideas
Thread Starter
|
Starting Member
Joined: Jul 2016
Posts: 220
From: South New Jersey
looking good!
I installed the same compartment in my 04 LS model and hid a small cheap 300watt amp in it for an 8" sub completely hidden, although any trip more than an hour it seems to heat up because of no ventilation and it'll shut itself off... pop the lid though and it'll jam for hours without issues lol
Also installed a 12v outlet with a switch for it, quick and easy spot to pull power for a tire pump or whatever else in the rear
Just for ideas
I installed the same compartment in my 04 LS model and hid a small cheap 300watt amp in it for an 8" sub
completely hidden, although any trip more than an hour it seems to heat up because of no ventilation and it'll shut itself off... pop the lid though and it'll jam for hours without issues lolAlso installed a 12v outlet with a switch for it, quick and easy spot to pull power for a tire pump or whatever else in the rear
Just for ideas
Oh and Tajohns34, did you want to see my pictures of the body mounts i did? i took a few pics and i did use urethane if your curious to see what it looks like. I will probably post them tomorrow.
Thread Starter
|
Starting Member
Joined: Jul 2016
Posts: 220
From: South New Jersey
Ok as promised for all you members who need to do body mounts, i feel your pain, here are the pics of the restoration i did. I only did the mounts that were terrible. in a few of the pics you can see i got big metal washers and painted them with bedliner and kind of used them like shims.
Anyway here they are, if you have any questions, post them


yes that fourth picture is upside down. i don't know why they keep doing that but you get the point
Anyway here they are, if you have any questions, post them
yes that fourth picture is upside down. i don't know why they keep doing that but you get the point
Thread Starter
|
Starting Member
Joined: Jul 2016
Posts: 220
From: South New Jersey
Ah yes i forgot to include that. I went the pick and pull that had a few blazers and i was able to wrench some bolts off with the washers. Their mounts all looked new. I pulled the rubber bushing off with one of them and i could have just got the bushing from the dealer. Mine looked like crap lol. As you can see i also used a oem body mount washer i pulled off a parts blazer for the top to hold the new bushing because the original cup was really rotted and wouldn't fit it very well anyway. I also don't feel much difference in ride quality either. Polyurethane is stiffer than rubber but i cant tell.
I installed my kicker speakers today. Took a few hours but i was doing it right. I spliced the factory plug off the old speakers and then i soddered and heatshrinked it. I also put double sided foam tape on the contact surfaces of the door panel and glued a spot that was cracked. also replaced some of the shot tree clips. It sounds so much better back there when there is two working speakers instead of one.
Here are the pics :


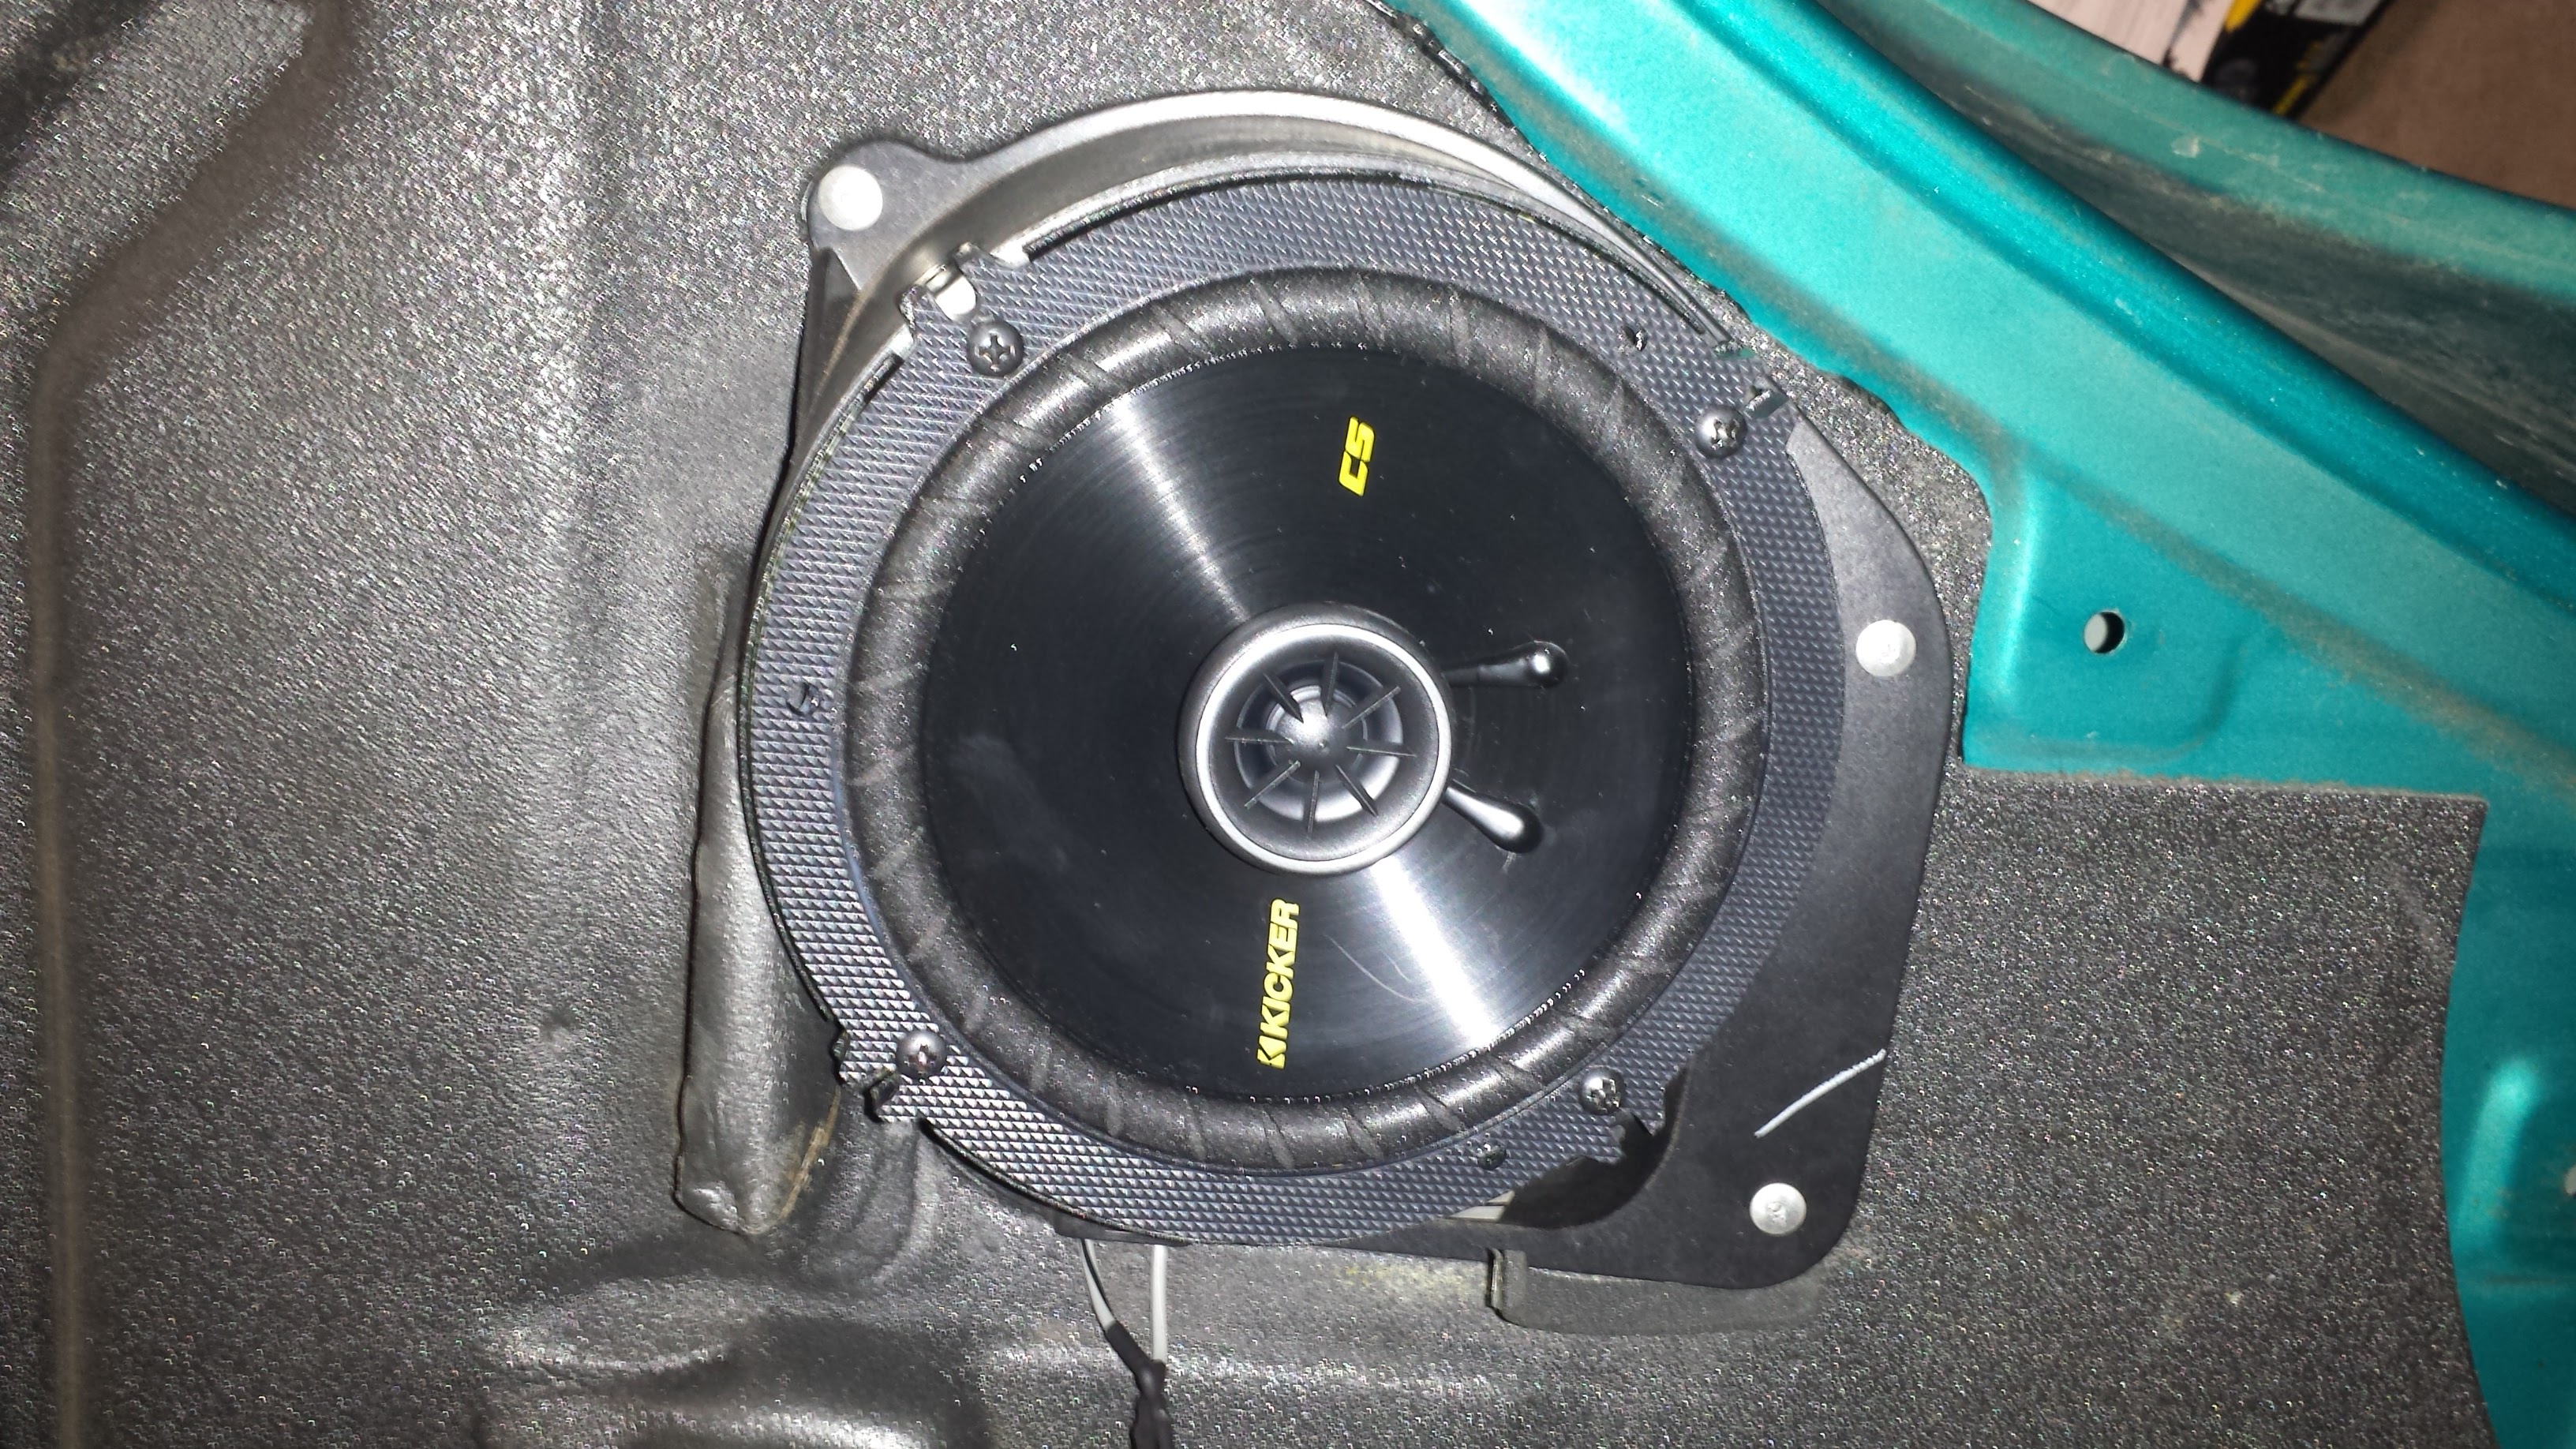
I installed my kicker speakers today. Took a few hours but i was doing it right. I spliced the factory plug off the old speakers and then i soddered and heatshrinked it. I also put double sided foam tape on the contact surfaces of the door panel and glued a spot that was cracked. also replaced some of the shot tree clips. It sounds so much better back there when there is two working speakers instead of one.
Here are the pics
:
Super Member
Joined: Jul 2012
Posts: 1,542
From: Glen Rock, PA
Nice work on the speaker install. I might consider getting a set of the kickers. I have a set of cheap JVCs in my back doors now that work okay but they are kinda meh. I had a really nice set of old lanzars that a friend gave me but they were too deep to fit, so they went in the back of my corolla. How well do they fit in the back doors?