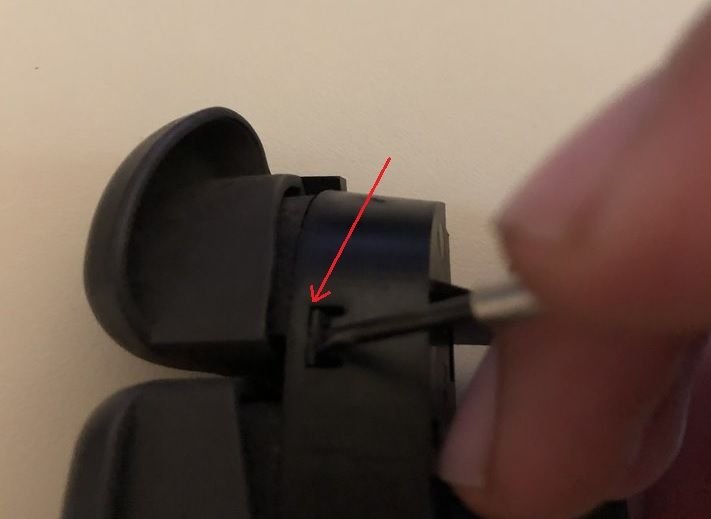
Audio steering control button
#4
Here is the thread you should read that I think covers all the bases. https://blazerforum.com/forum/lighti...s-96096/page2/
Be careful taking the switch body apart. You have to pry it open and you can break the plastic tabs if you are not careful. I set of jeweler's screwdrivers to use as mini-prybars is useful.
And FYI, the bulbs I used seemed a bit on the dim side but then I realized you will only want to use these controls using your peripheral vision so that you likely won't want them too bright. Instead bright enough to see where they are (instead of actually reading them) is sufficient; at least for me.
Good Luck. Keep us posted and be sure to ask questions.
#5
And here are my notes on the bulbs in the remote radio control. I also have info on the OEM radio bulbs.Remote Steering Wheel Radio Controls
- replacement bulbs used:
- Mouser.com part number 560-23, JKL 23
- size: T-1,
- voltage/current rating: 14 V/40 mA
- MSCP: 0.15
- filament type: C-2F
- average life hours rating: 16,000 hours
- alternate bulbs: T-1
- voltage/current rating: 14 V/65 mA
- MSCP: 0.15
- average life hours rating:16,000 hours
- http://audioxpress.org/listing/delco...-3mm-14-volts/
- Mouser.com part number 560-23, JKL 23
- original bulb specs as measured
- size: T-1
- 14 V/39 mA
- filament type: C-2V (supported)
#7
They are easy to remove from the small circuit boards. Just apply heat from the tip of a soldering iron to the solder pads on either side of the bulb base/holder. Once removed from the PCB, the bulbs pull out of their little off-white plastic holders. Then you peel off the blue silicone bulb cover and transfer it to a new bulb.
#8
The instructions I posted are kind of buried in my old post. Here is the pertinent quote:
They are easy to remove from the small circuit boards. Just apply heat from the tip of a soldering iron to the solder pads on either side of the bulb base/holder. Once removed from the PCB, the bulbs pull out of their little off-white plastic holders. Then you peel off the blue silicone bulb cover and transfer it to a new bulb.
They are easy to remove from the small circuit boards. Just apply heat from the tip of a soldering iron to the solder pads on either side of the bulb base/holder. Once removed from the PCB, the bulbs pull out of their little off-white plastic holders. Then you peel off the blue silicone bulb cover and transfer it to a new bulb.
Today I pull them out from my car but the problem is which side I should push the plastic lock?


thank you
#9

Below are pics from when I did mine. I thought I had lost them!
But perhaps better are the comments on this thread that I had started and in which Blazen_Red_4x4 added some great comments.
https://blazerforum.com/forum/lighti...ol-leds-96096/


Thread
Thread Starter
Forum
Replies
Last Post
raza514
2nd Generation S-series (1995-2005) Tech
30
12-24-2010 08:16 AM


