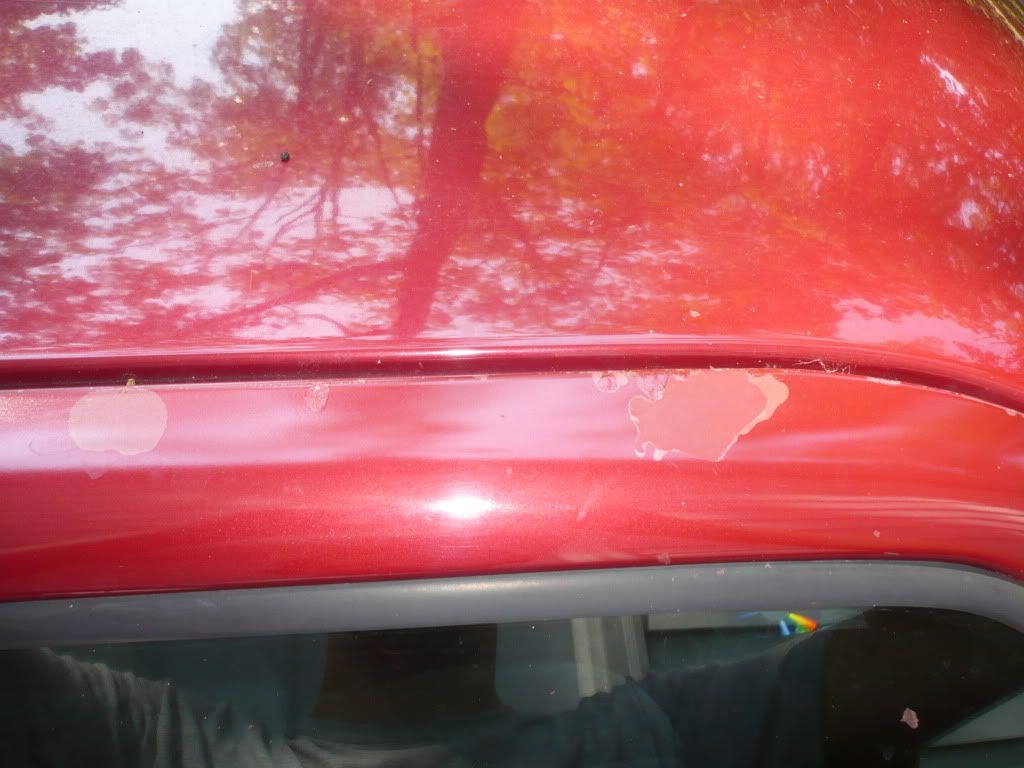
Clear Coat Chips
#1
On the top of my passenger door I have these chips shown in the pictures. They are maybe 2" each. What could I use or do to fix this? I really just want to stop the peeling and make it look a little better. It doesnt have to be perfection. Thank you

#2
I got the same problem, ill bump this in hopes that someone else will respond.
what i was thinking tho was just wet sanding and getting some clear coat touch up. but idk hopefully other people can give their input.
what i was thinking tho was just wet sanding and getting some clear coat touch up. but idk hopefully other people can give their input.
#3
I actually ended up doing that. It looks better then the chps but it isnt great. For some reason the clear coat didnt take very well and im starting to get bubbles under what I sprayed. Maybe someone else will have a suggestion
#4
hmm, it should have took to the paint if you sanded it well enough. i was doing a little more research on it and thats really the only way to fix it. so if you dont like the results wet sand it again with 1000 grit then spray the clear coat on.
Edit: it also looks like your paint is faded there so you might want to wet sand it, hit it with some touch up paint then clear coat it and that should look lots better.
Edit: it also looks like your paint is faded there so you might want to wet sand it, hit it with some touch up paint then clear coat it and that should look lots better.
#5
First thing you have to do is lightly scrape off the flaking and then sand away around the edges of where it was flaking, then give it a good couple coats of fresh clear, if it keeps bubbling, you may have to just sand down to the color on the top of the door where its peeling and reclear the whole section.
The hood on my 93 is doing that, I am just going to sand down the whole hood and repaint it.
The hood on my 93 is doing that, I am just going to sand down the whole hood and repaint it.
#6
Antman,
The reason you're getting bubbles is due to the lack of adhesion between the old finish and the new clear coat. In order to resolve that problem, you need to LIGHTLY sand and/or scuff the old surfaces (with paint scuffing pad) then use some wax and grease remover BEFORE applying fresh clear coat.
Flaking clear coat results from breakdown of the finish due to ultra-violet. The difficulty to just reapplying fresh clear over old base coat is avoiding breaking thru the old base and exposing the primer layer. OEM finishes are very thin...only a few millimeters...so too much sanding can be detrimental.
How are you applying the new clear...is the clear coat from a rattle can (usually single stage paint) or it is 2-part and applied with a spray gun? Like Richphotos recommends, it is best to re-clear a whole section/panel rather than just doing a spot.
Lastly, all paint and repair jobs start and end with good preparation and, most importantly, cleanliness.
Good luck!
#7
thanks a million from my end! top of my passenger fender started doing this around the antenna area... is there a "temperature needed" for the rattle can kind? its cold here, but in the sun in the shed its really quite warm, and how long should it stay in "warm" conditions?
sorry for bringing the dead back to life! but thanks!
sorry for bringing the dead back to life! but thanks!
#8
The surface and the pain in the can must be above 65°f, also, once its painted, the colder it is, the longer it will take to dry. I would wait until winter is over to repair it honestly.
Thread
Thread Starter
Forum
Replies
Last Post
DetailersDomain
Detailing
4
06-09-2013 07:43 PM
DetailersDomain
Detailing
4
10-12-2012 10:13 PM


