
"dirt devil" build thread

Super Moderator
Joined: Sep 2011
Posts: 4,459
From: Northern VA

EVERYTHING looks sick!! I'm jealous and will be pming you for some info after a bit for sure! And I haven't forgotten about the info I owe you either work and family have just had me running crazy I apologize and I promise to make time this coming week and get it done!
thx rex I appreciate it all. take ur time family is more important when u got time sent me the info for the wiring on the rad fans. u can pm me anytime for info and I can help u out

Starting Member
Joined: Aug 2013
Posts: 105
then i decided to tried to make my own trail realizing it was a drop off and i was stuck for 4 hours


then i decided to play in some more mud the next weekend


then i decided to go offroading in guelph


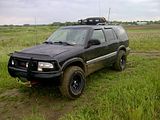
then i started to add some recovery gear to the roof


then that night i decided to take some pics of my lights


then i decided to play in some more mud the next weekend


then i decided to go offroading in guelph


then i started to add some recovery gear to the roof


then that night i decided to take some pics of my lights


was it hard to put the 2 door tire carrier on. I really like the look of the tire being on the back. plus the cable snapped that olds the tire underneath and way too expensive to replace just for it to be in the way. I have a 97 4 door.that I plan on putting a body lift on and shackle hangers and torsion keys. any info is greatly appreciated thank you
the tire carrier was a bit tricky installing it has to be alighned perfectly and if u don't mind drilling holes into ur quarter panel. I got it all done in 2 days and never had a issue once with it. as for ur shackels the bolts like to seize into the bushing sleeves and can be a real pain in the *** to get out. if u do a bodylift I advise u to take pb blaster or any penetrating oil and spray inside the body mounts to soak the bolts for weeks on end spray each day or a few times a day or u can snap the bolts off inside the body and making ur life a night mare. I sprayed mine for half a year til I was able to afford the body lift kit.
Starting Member
Joined: Aug 2013
Posts: 105
the tire carrier was a bit tricky installing it has to be alighned perfectly and if u don't mind drilling holes into ur quarter panel. I got it all done in 2 days and never had a issue once with it. as for ur shackels the bolts like to seize into the bushing sleeves and can be a real pain in the *** to get out. if u do a bodylift I advise u to take pb blaster or any penetrating oil and spray inside the body mounts to soak the bolts for weeks on end spray each day or a few times a day or u can snap the bolts off inside the body and making ur life a night mare. I sprayed mine for half a year til I was able to afford the body lift kit.
thx man I appreciate it I look at ppls builds and I lean to modify mine for everyone to use for their own truck. I built mine for a daily driver and hardcore wheeler for rocks and deep water forges and mud.
hey guys so its been awhile since I posted anything on my forum. I have been busy getting the truck ready for winter and touching up all the much needed things I been over looking. I first got a new windshield installed for 225 since mine was cracked from the fire.

then I added heavy duty industrial rain x formula to the new window and added a new window sticker banner

then I added some door decals and window decals to complete the zombie apocalypse theme.


I decided to port my onboard air compressor to flow more air to the tank faster. was a lot easier then I thought
here before

heres after


it flows a lot faster and I lubed it all up as well.
since I didn't have a washer fluid resivour I had to think of a way to make a custom one to fit in my engine compartment since the snorkel took the place of the factory one. heres what I did. I took a spray bottle and added a dodge Durango washer motor to the bottom and a ford focus flex nozzle hose. it works great and fits in the tight area. the factory gm plug connects to the dodge Durango one perfectly. heres pics of how I did it.


then I got 21 bright 194 led bulbs and stuck them into my overhead console for the vanity lights.
I decided to visit my friend to get some more work done on my truck and added a custom front lisence plate bracket and filled in the gaps between my bumper and headlights


after its painted


i also decided to change the steering box as mine was worn out. i bought a scrap yard one and sent it out to have all the o rings changed and they changed the gears to make it a high steer box and added a new pitman arm. i decided to change the idler arm as well on the 1 ton set up to a moog.


i got it all changed out and added new lucas power steering fluid with conditioners and a fresh wheel alighment and it handles like a sports car.
i had my friend make up some custom brackets for my highlift jack and shovel and axe so i can fasten it to my roof rack better. i must say its a overall better design


